

I'm a big fan of needle-turn appliqué quilts. And by fan, I mean, I really really like to look at them.
If you're at all like me, you might find the prospect of doing said appliqué intimidating.
I know I did. The conflict, I don't like doing fusible appliqué. So, in an attempt to try new things and get some new skills under my belt, I've taken a couple of classes with some of the greats who regularly use needle turn, namely Jen Kingwell and Carolyn Friedlander. Kudos to you ladies for your patience with my total newbie-ness.
There are lots of ways to do it, but here are my two favorites.
The first came from a class with Carolyn Friedlander. It involves a Dritz seam guide.
You take scrap thread. (I use bright colors that I need to use up. It's not going to stay, so take is as a chance to clear out your bobbins.)
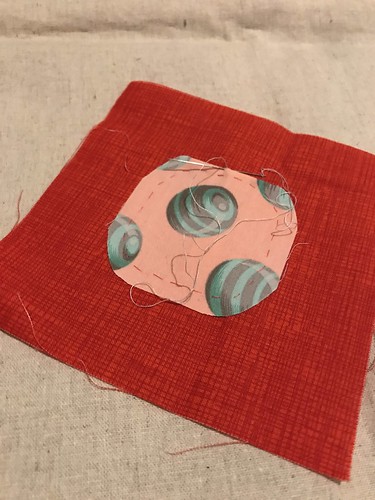
You pin the piece where you want it to go. Then you thread baste it on, using the seam guide (mine is a Dritz) as your guide. Don't knot the thread. Just leave tails. You'll pull the basting thread out later. I baste using a quarter inch basting line. That means that when I turn it under, I'll have about an 1/8" seam allowance.
Basted:

I put my knot (using Aurifil 80 wt thread...or something that matches-ish) on the back and pull up in the seam allowance between the two layers of fabric. Then I use the tip of my needle to push/tuck the fabric under and sew on the very edge. (I'm also a big fan of Tulip appliqué needles.)
Sewn (and the basting threads pulled):

Why I love this. 1. Once something is thread basted, I don't need pins. I always seem to lose them when I'm traveling, so this is a plus. 2. The basting thread gives you a hard edge to push the fabric into that you are turning under. 3. You end up with a more accurate seam allowance.
The other way I've done this is using a silver gel pen. (I think this is a mix of Jen Kingwell's technique and Sara Fielke's supplies.)
I trace the template on the front of the fabric. When I cut it, I cut an approximate quarter inch seam allowance. Then the goal is to turn the edge under JUST enough to hide the gel pen line (or Frixion or pencil line...whatever floats your boat). I'm using this technique for the Jen Kingwell quilts I have yet to finish. I feel like I'm slower this way. I could have used mylar and starch to make my circle perfect perfect...but, honestly, I don't mind if it's a bit imperfect. I like that I made it with my hands.
This is a circle from my Golden Days quilt. I have one more big appliqué block and 41 circles to finish.
(I'm using the pen technique for this one.)

Some of my favorite supplies (total because I love them). I get nothing for shouting about how awesome they are.

My Dritz quide, those lovely Tulip appliqué needles, Aurifil 80wt thread, a silver gel pen, and a Daylight portable light/magnifier. (I'm getting old, y'all.) Best of all, they fit in my project bag with a pair of snips and I always have a project ready to go.
I hope you'll try the basting technique. Try a squircle. Take the pressure off. It doesn't have to be perfect.